Glazing kitchen cabinets

Are you ready for something different for your painted cabinets?

Try Glazing kitchen cabinets! We are painting kitchen cabinets at about a kitchen and a half per week. Most people are just painting with solid colors, some will add a second color for islands.  One thing we used to do a lot of was glazing wood, specifically glazing kitchen cabinets.

Ever seen glazed cabinets? Do you know what a glazed cabinet looks like? Can you see yourself wanting a glazed cabinet?

What is a glazed cabinet?

In the simplest of terms a glazed cabinet or piece of furniture is something that has been painted with a color. Once that color is dry, we add a tinted clear finish, then spray, brush or roll that color onto the surface, where we wipe it off until we achieve the color or style the customer wants.

Just like every other type of decorative painting there are different ways you can glaze

  • Pinstripe – simple stripes along the edges of the doors
  • Wipe on – almost like staining, the glaze is applied to the surface by wiping it on
  • Wipe off – we apply the color to the surface and wipe off until we get the color the customer wants
  • Spray on – this one we can do with smaller sprayers, not a lot of overspray, and add an aged look to the painted surface

You can actually watch a video we did about glazing cabinets here 

What colors can you glaze?

That is an easy enough question to answer…any color. What looks good? That is a whole different story.  Usually applying a dark color over a lighter color looks the best (in my opinion), I have seen some dark cherry cabinets that were glazed with a light white over it in the groves of the doors. It didn’t look bad, just not my taste.

A trend in flooring and furniture is a type of glazing called a Ceruse finish. Here is a link to video that shows what this looks like .This unique as it typically uses heavy grain woods such as oak, which really show the grain, a dark color is applied to the oak, then it is glazed with a light color glaze and man does it pop!  Again, not a huge fan of it but it is interesting.  The finishes we are seeing are natural oak with white, that appear to mimic picking finishes done in the 80’s.

How durable is a glazed kitchen cabinet finish?

The best part about a glazed finish is that it can be as durable as a painted surface. Depending on the application and materials used, it can last a long time and stand up to normal wear and tear.

Just like traditional painted surfaces, the painted wood surfaces do not tolerate water!  So not using hot soapy water, not allowing water to stand on the painted surface, and no harsh cleaners will definitely allow for longevity.

Does a glazed finish make a big difference in how my kitchen will look?

A picture is worth a 1,000 words…

unglazed cabinet door - kitchen cabinet painters
Here is a unglazed cabinet door
glazing kitchen cabinets - cabinet refinishing elgin il
The same door glazed
glazed kitchen cabinets

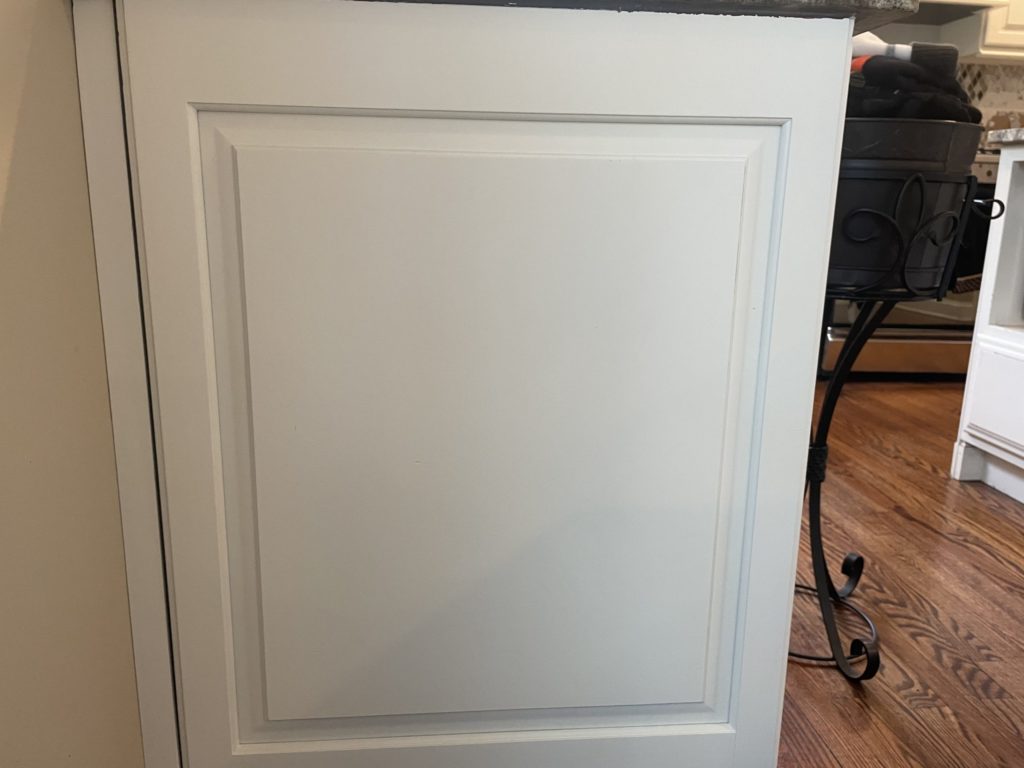
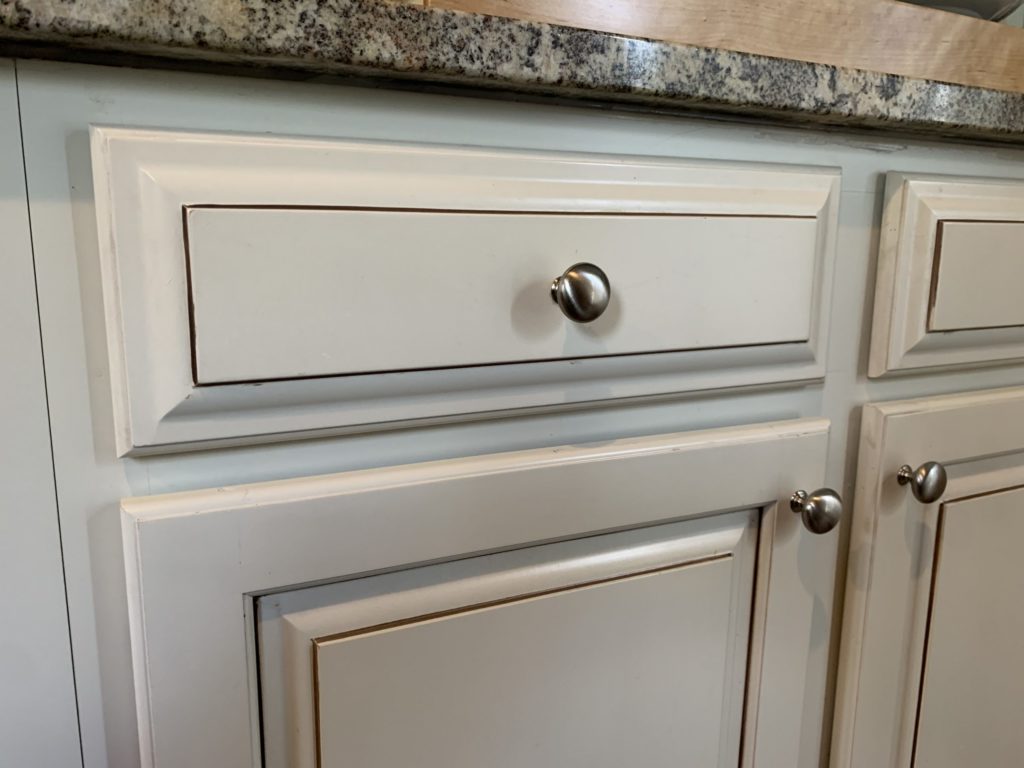
Cabinet door and drawer front that have been glazed

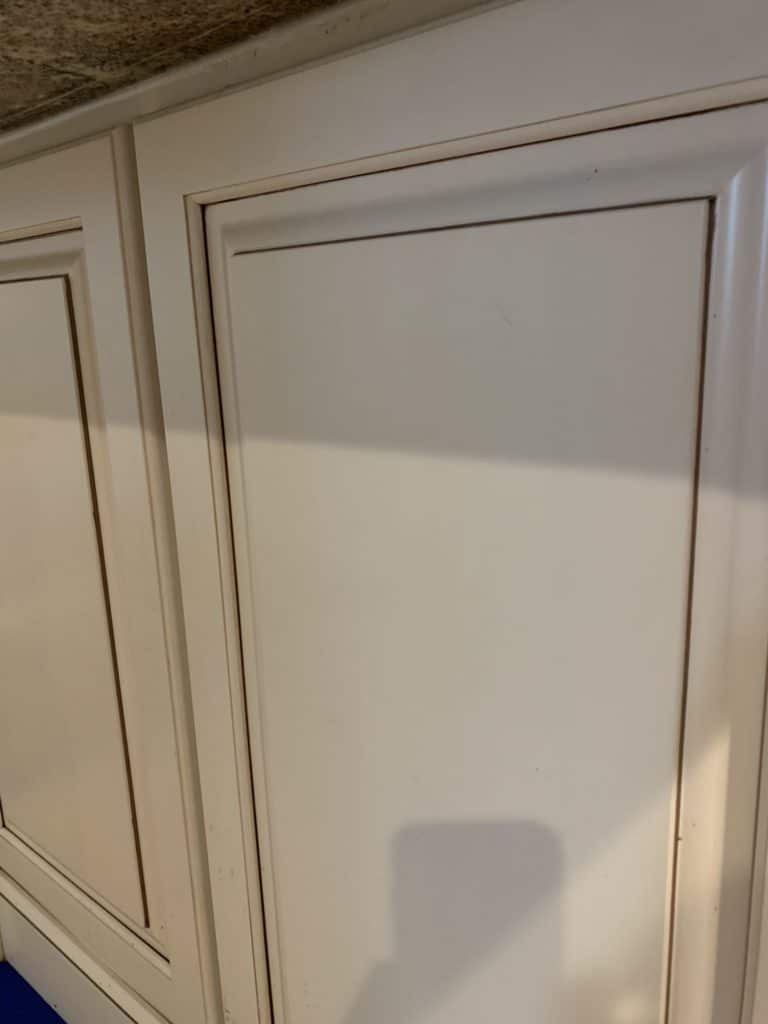
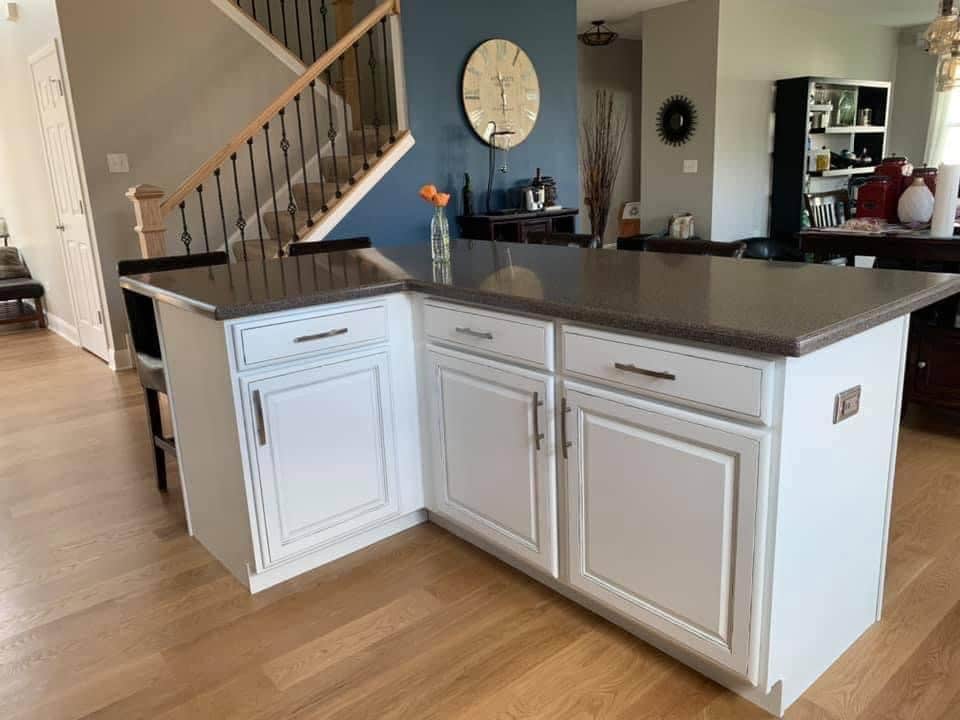
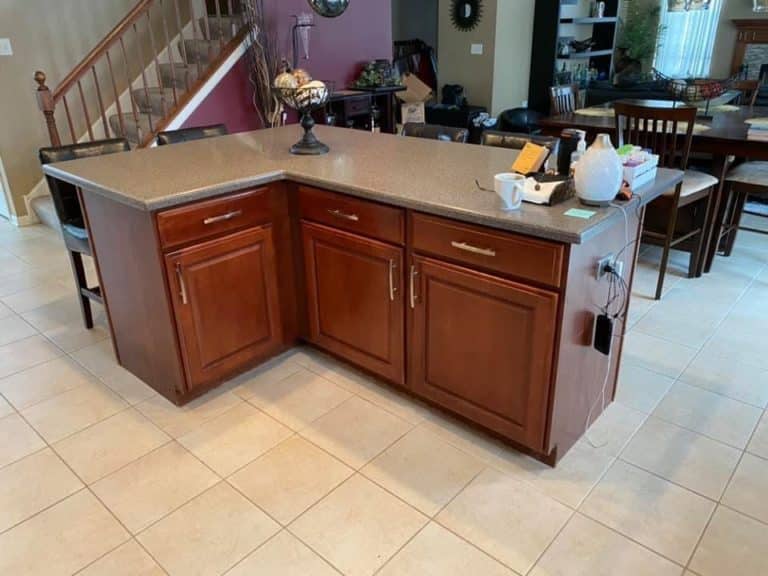
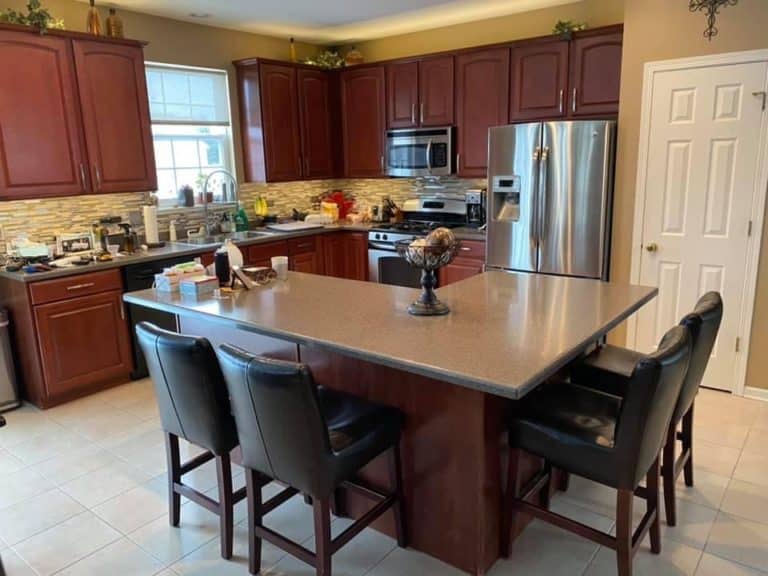
Before and after photos of glazed kitchen cabinets

Of course when you go all out and paint the cabinets before they are glazed it is even a bigger wow factor!

painting cherry cabinets

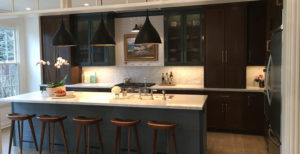
Cherry cabinets painted and glazed

before glazing kitchen cabinets
Cherry cabinets before paint and glaze
Cabinets before paint and glaze
Cabinets after paint and glaze

Glazed cabinets is not for everyone. It has a certain place and it is something that takes practice to do. We’ve also had projects where we are painting over glazed cabinets as well. We hope we have the opportunity to help you with your cabinet painting needs.

We love to see how we can help you love the space you’re in!

How We Can Use Photoshop for Decorating Your Home

One of my networking and professional groups has led me to Linda Topel. She has a great talent for Photoshop. I have seen her work, used her for some special projects and asked if she could share some information about how Photoshop can be used to place a faux finish in your home without ever opening a can of paint.

Take it away Linda…

Linda: My first memory of the Arts is when I was about 4 years old. I was painting with wet concrete all over my Dad’s car…it seemed like a proper support to me. He wasn’t too happy since he had to stop pouring the new patio and wash the car. Needless to say, I’ve tended to avoid concrete since then! But every other medium has been fair game. I found my way to online art forums after years of practicing alone and I discovered Faux. What a world of beauty it is, too!
While doing that, I found and fell in love with Photoshop. After a few years of experience, I look forward to doing what I love for more people: Helping your client see what you see for their home by Photoshopping a picture of your sample board into a picture of their room.

David: How is this done?

Linda: Pictures are e-mailed to me — photoshopbylinda@gmail.com — with your instructions. Hi-res images work best and they can also be sent to me via cellphone e-mail (not as a text). The better the picture, the better the end result. I then provide a quote, time frame, and payment instructions. Soon, the artist and/or designer will have images to show their clients!

David: Can you change the color?

Linda: Sometimes my clients love a finish but have a different color scheme going on.
I can change the color! For more accuracy, a swatch or another picture of the color to be used should be sent. I do advise that lighting and different monitors can affect the outcome.
I think it will definitely be very helpful in certain client situations! Even the reason for the decision Please do feel free to ask questions…either email or on my Facebook page…which is open to the public…

I Live Love and Laugh in Art.

David: How do you take payments?

Linda: Payments will be done thru Paypal. You simply set up an account with Paypal and send the money to my email address ….its easy and safe ….prices will be around 20.00 per finished photo…. Depending on complexity

Thanks Linda!!

Why is Venetian Plaster So Expensive?

We are working on several decorative plaster jobs right now and the materials range from $30.00 per gallon to $80.00 per gallon. You also have to account for the walls to be primed, sanded, areas around covered, the time to hand apply the plaster with a trowel, then dry, then polish to the desired sheen, then apply a protective finish.

The cheapest Venetian plaster is from the local home improvement stores. They are usually an acrylic based product, harder to apply, harder to polish.What you save money for materials you lose in time to do the work.

The expensive plasters are lime based. We have to use a special primer for them to make sure they bond to the surface and to make sure the lime will not eat away your walls. They apply to using warm butter and polish to a mirror-like finish with little effort. They are amazing products. The better products are from one of our favorite stores Chicago Institute of Fine finishes in Carol Stream. Aside from an amazing array of products to use the knowledge of product usage is superior to anyone else. They are there to help make your world beautiful.

Why Should I Buy a Faux Finish

As you stand in line at Sherwin Williams, Home Depot, Lowes, Menards, or Benjamin Moore looking at the wall treatments that are available, how do you decide what you want?

Are you going to settle for what is in the wallpaper books? Are you going to use the same thing that came with your bedding told you to use? WHY?

If you are going through the trouble of new bedding, new paint or decorating new drapes why would you want to use the same wallpaper as someone else? You can have something that fits your budget, your style, your colors, your own design, and your personality.

Faux finishes are designed for you to give you something that is all yours. No one else will have it. This is all about you.

How can we help you?

What to Do with Plaster Gone Bad

We just got a call from a customer to help with their painting and Faux finishing. When we arrived at their home we found a kitchen that had cost more that both of my cars together. It was beyond stunning. The walls however needed help. Colors were off, there was standard drywall, stucco, and some type of broken/rough plaster scattered throughout the room. In trying to save money, we painted everything one color and are glazing it with a 2 tone color wash to pick up the colors from the wood cabinets and the granite counter. What was thrown together is now actually appearing to have been planned!With the cabinets a wormy chestnut the rough plaster and stucco actually look very well together-I never would have though of that.

We next get to fix some foundation cracks, paint bedroom closet doors, paint a family room, paint 2 kids bedrooms, then figure out what type of murals we will paint in the rooms for the kids. Fun job, great people to work with.

An Inexpensive Faux Finish

We had a customer that was looking to update the look of her foyer and main living area. They had this part of their home painted about 5 years ago and since had changed drapes, carpet, and furniture so the color of the walls didn’t really match the paint color. Because the paint was in good condition, there was no patching of holes, and it was clean, we were able to glaze the walls with 2 colors that not only updated to color but the feel of the room.

This is just one of the ways we can help you update your home and stay in your decorating budget.

Book Your FREE Estimate
MM slash DD slash YYYY
This field is for validation purposes and should be left unchanged.
close

Your Free Estimate

To help home and businesses owners during this challenging time, we are offering free virtual estimates.

Fill out the form below and we will schedule a time for a free video call estimate.